How’s it going everyone? My name is William Pokorny and I am going to be adding tactical tips. These tips can be anything that I feel is a perishable skill, or just breaking down a few things to make them a little easier to understand.
The first one I want to get into is map reading on a Military Grid Reference System (MGRS) map. The most commonly used maps in the military is MGRS. Sure you can always use a gps or gps app. You may end up in an area that you don’t have service for your phone. A map then becomes the best thing to give you a full spectrum overview of the area.
Tools You Will Need:
To start you’re going to need a protractor, I recommend the MapTools Protractor. It is easy to use and usually very accurate. The downside of it is it will rub off pretty quick if you just keep it in a pack. Other major pros to the protractor is not having to worry about flipping it. You will need map pens, I also recommend permanent, super fine tip. Permanent pens allow you to do work without smudging the pen marks. Erasing the pen is simple you just need alcohol such as: hand sanitizer, alcohol wipes, or an eraser pen.
Mapwork and How to Read a Map:
We will now get into the actual work process. We will start by finding our square. 6 and 8 digit grids are the most commonly used in my own experience. To find your box you will take the first two numbers from each side of the grid. Such as 9475 1232. You will then find on the map where these two numbers intersect. The correct box is the top right of this intersecting line, since the rule with map reading is “right and up”. The bottom left corner of this box is grid 9400 1200.
At this point, you have a few options on how to find your grid on the map. Unless you are doing an actual land navigation course that requires you to find some sort of marker it is unlikely that your grid will be in an area with nothing there. Obviously, there are exceptions to this rule such as for checkpoints on a patrol, possible ambush sights, and just less populated areas in general. But primarily your grid should match up with some sort of terrain feature such as: a specific intersection of a road, a part of a town, an obvious piece of advantageous terrain, etc. Using some common sense you can take the last two digits of each grid 9475 1232, and see that you will go 3/4 of the box to the right and about a third of the box up. If you see a feature there, 9 times out of 10 that is your point.
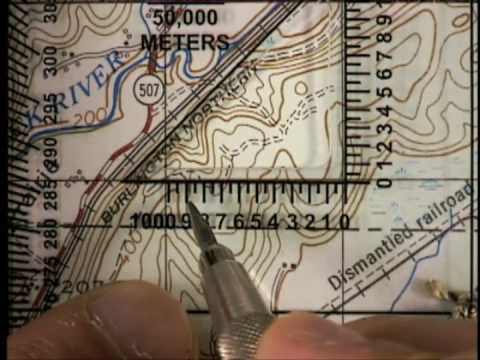
It’s always good to double check with the protractor if you used the previous method. Your other option is to use your protractor right off the bat. I will be explaining this as if you are using a triangle cutout protractor such as the one linked above. You will take the bottom right of the triangle and line it up with the bottom left of the box showing you at the coordinate XX00 XX00. You will the slide the protractor to the right until that corner of the box lines up with the half-line between 7 and 8. Next, you will take your map pen and go up the right side of the triangle and place a small dot about halfway between the 3 and the half-line above it. You have now successfully plotted your point.
Last Second Tips:
It is best to try to basically scrape your pen down the plastic when placing the dot so it is as close as you can make it to where it needs to be. Another trick I use is circling the dot, since you want your dot small it may end up hard to find again if you look at something else. A very important tip if you are in the military, DO NOT USE RED PEN. If you use red pen and you go to use a red lens at night, you will be unable to see your map work.
Next week I will be getting into a little bit of selecting attack points, route selection, terrain association, and a few other things that are more focused on stuff on the ground.
Share This


